DoD Tutorial - Part 3: Defending the Model and Advanced Attacks
Introduction
Welcome to Part 3 of the Drone Object Detection Tutorial for HEART. In Part 1, you were introduced to Amelia and her use case for HEART, the requirements she needs to meet to use HEART, and how to install HEART and the relevant data set. In Part 2, you used HEART to attack the drone object detection model and see how it was vulnerable to PGD attacks.
In Part 3, you will learn how to use various techniques to defend the model from attacks and apply advanced attack techniques.

Defending the Model
The first defense method Amelia will use is JPEG compression. JPEG compression can help to defend against adversarial attacks by “compressing away” visually imperceptible pixel manipulations that are often used in adversarial attacks. This makes these types of attacks less effective when the image is fed into an object detector.
Amelia sets up the JPEG Compression defense by first selecting the quality of the JPEG output she wants. She selects “25” out of a maximum, uncompressed, value of “100”. Next, she initializes the model with the JPEG compression defense applied (“preprocessing_defences”). Finally, she runs the model with the defense. She uses loop statement to plot the image outputs.
preprocessing_defense = JpegCompression(clip_values=(0,1),
                                        channels_first=True,
                                        apply_predict=True,
                                        quality=25
                                        )

detector_defended = JaticPyTorchObjectDetector(model_type="detr_resnet50",
                                                device_type='cpu',
                                                input_shape=(3, 800, 800),
                                                clip_values=(0, 1),
                                                attack_losses=( "loss_ce",
                                                    "loss_bbox",
                                                    "loss_giou",),
                                                preprocessing=(MEAN, STD),
                                                preprocessing_defences=[preprocessing_defense])

'''
View detections on adversarial images
'''
adv_detections = detector_defended(x_advPGD)
for i in range(2): #to see all, use range(len(adv_detections)):
    preds_orig = extract_predictions(adv_detections[i], 0.5)
    plot_image_with_boxes(img=x_advPGD[i].transpose(1,2,0).copy(),
                          boxes=preds_orig[1], pred_cls=preds_orig[0], title="Detections")
Image Outputs 
Original Example Image 1
In the original image, Amelia can see the different objects detected, as identified by the green bounding boxes. Many items are detecetd such as Trucks, Person, and Car. Amelia does a visual inspection and sees that the bounding boxes are labeled accurately.
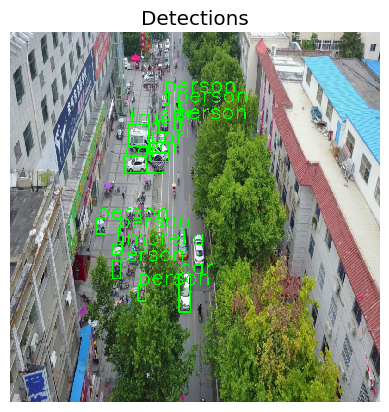
Attacked Example Image 1
In the attacked image below, Amelia can see some obvious differences in the bounding boxes compared to the original image on the left. Notably, on the right side of the image, she can see that “Person” is detected. When she visually inspects this detection, she can see that a person is not only NOT present in the original output, but also that there are no people inside the bounding boxes. The attacked model, therefore, shows that it produces unwanted and inaccurate results as a result of the attack.
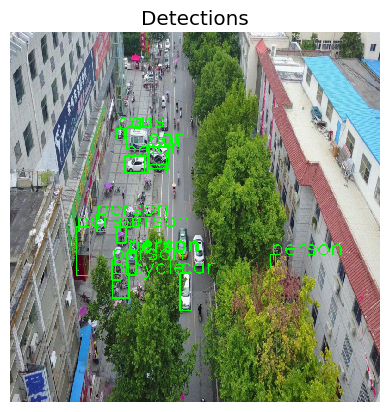
Defended Example Image 1
In the defended image below, Amelia can see that the erroneous “Person” objects on the left and right sides of the image are removed. Thus, she is able to see that the model defense is somewhat effective against the original PGD attack.
Original Example Image 2
In the original example image 2, Amelia can again see the different objects detected, as identified by the green bounding boxes. She can also again see the different objects are detected like cars, trucks, and people. Amelia does a visual inspection and sees that the bounding boxes are labeled accurately.
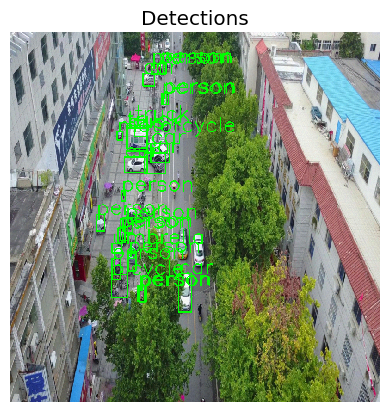
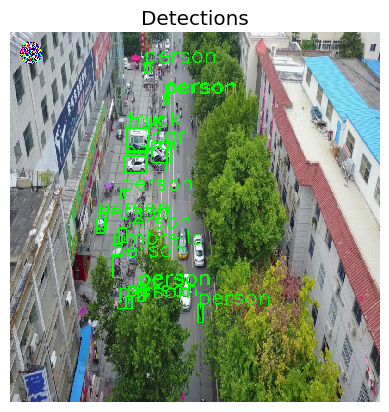
Attacked Example Image 2
In the attacked example image 2 below, Amelia sees and inspects a very different set of bounding boxes. Interestingly, many of the bounding boxes in the middle of the image are completely removed, showing the objects were not detecetd at all. Additionally, signs and trucks are being mis-identified as “snowboards”. After inspecting the image, Amelia can see that the attacked model produces a number of false positive ouputs as well as misses many other objects.
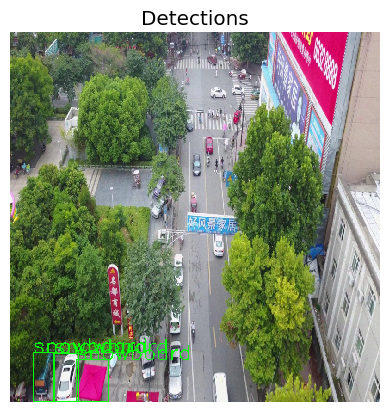
Defended Example Image 2
In the defended example image 2 below, Amelia immediately sees that the incorrect “snowboard” objects are no longer detected. Additionally, the Person, Car, and Truck objects that were missed in the attacked image are now being detected again. She concludes that the defense is effective.

Amelia notices that the overall performance of the defended model is indeed a little better than the undefended and attacked model based on her visual inspection. She will now further evaluate this by computing the mean average precision metric from above. Ideally, she would here simply compute an attack on the full model, but this is currently note possible as the gradients do not propagate back through the compression.
This is the same evaluation she ran before, but the model she is evaluting is “detector_defended” instead of “detector”.
map_args = {
    "box_format": "xyxy",
    "iou_type": "bbox",
    "iou_thresholds": [0.5],
    "rec_thresholds": [0.0, 0.1, 0.2, 0.3, 0.4, 0.5, 0.6, 0.7, 0.8, 0.9, 1.0],
    "max_detection_thresholds": [1, 10, 100],
    "class_metrics": False,
    "extended_summary": False,
    "average": "macro"
}

attack = JaticAttack(
    ProjectedGradientDescent(
        detector,
        max_iter=1,
        eps_step=0.01,
        eps=0.03,
        targeted=False,
        verbose=False,
    ),
    norm=2,
)

data_with_detections = ImageDataset(sample_data, deepcopy(detections), threshold=0.9)

metric = HeartMAPMetric(**map_args)

results, _, _ = evaluate(
    model=detector_defended,
    dataset=data_with_detections,
    metric=metric,
    augmentation=attack,
)
HEARTs MAP matric confirms Amelia’s intuition that the defended model is better in terms of performance: the MAP increased to 0.27401 from 0.08463 when it was under attack.
Defending the Model Wrap Up
Overall, Amelia notices that the JPEG compression defense can be effective against attacks (and the PGD attacks in particular). While the defense may not completely nullify an attack, it was able both eliminate false positives and false negatives.
Advanced Attacks
Adaptive Patch Attack
The previous PGD attack is rather easy to defend with JPEG compression. The perturbations added are small pixel changes to the entire image, which are easily removed by the compression.
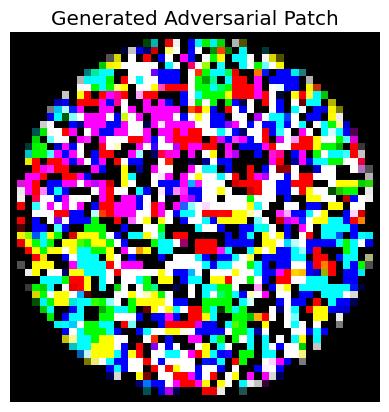
Next, Amelia will use an Adaptive Attack to work around this type of defense. An adaptive attack exploits knowledge about the defense. In this case, she knows that the defense can work against PGD attacks, so she will now use use a patch attack. A patch attack is a strong, local perturbation, that is limited to a small area of the image. The JPEG compression is thus less likely to alter the perturbation strongly. Below, you can see an example of what a “patch” looks like. It will be applied to the corner of the image by Amelia. Even though a human may glance by the patch and think it’s just some random pixels, the detector model can have unexpected and adverse reactions.
Patch Attack Method
Definition: A patch attack, in the context of computer vision, is a type of adversarial attack where an attacker creates a specific, often small, patch (like a sticker) that, when placed on an image, can cause a machine learning model to misclassify the image. You can learn more about Patch attacks here.
Example Patch
To conduct the patch attack, Amelia first initializes the data.
detections = detector(sample_data)
targeted_data = TargetedImageDataset(sample_data, deepcopy(detections), NUM_SAMPLES)

assert isinstance(targeted_data, od_dataset)

targeted_data = torch.utils.data.Subset(targeted_data, list(range(1)))
Next, she sets the attack parameters. She notes new parameters that shes sees such as patch_shape, patch_location, and patch_type.
rotation_max=0.0
scale_min=0.5
scale_max=1.0
distortion_scale_max=0.0
learning_rate=0.9
max_iter=50
batch_size=16
patch_shape=(3, 50, 50)
patch_location=(20,20)
patch_type="circle"
optimizer="Adam"
Here, Amelia initializaes the attack. She enteres uses that parameters that she previously set in the attack initialization (patch_shape, patch_location, patch_type).
patchAttack = JaticAttack(
    AdversarialPatchPyTorch(
        detector, rotation_max=rotation_max,
        scale_min=scale_min, scale_max=scale_max,
        optimizer=optimizer, distortion_scale_max=distortion_scale_max,
        learning_rate=learning_rate, max_iter=max_iter,
        batch_size=batch_size, patch_location=patch_location,
        patch_shape=patch_shape, patch_type=patch_type,
        verbose=True, targeted=True,
    )
)
Now, Amelia is ready to run the attack, patchAttack, against the targeted_data.
#Generate adversarial images
px_adv, y, metadata = patchAttack(data=targeted_data)
After running the attack, she accesses and plots the data for review.
patch = metadata[0]["patch"]
patch_mask = metadata[0]["mask"]


#plot patch
plt.axis("off")
plt.imshow(((patch) * patch_mask).transpose(1,2,0))
_ = plt.title('Generated Adversarial Patch')
plt.show()
print('-------------')

for i in range(len(px_adv)):
    preds_orig = extract_predictions(detections[i], 0.5)
    img = np.asarray(px_adv[i].transpose(1,2,0))
    plot_image_with_boxes(img=img.copy(), boxes=preds_orig[1], pred_cls=preds_orig[0], title="Detections")
Image Outputs 
Original Example Image 1
In the original image, Amelia can see the different objects detected, as identified by the green bounding boxes. Many items are detecetd such as Trucks, Person, and Car. Amelia does a visual inspection and sees that the bounding boxes are labeled accurately.
PGD Attacked Example Image 1
In the attacked image below, Amelia can see some obvious differences in the bounding boxes compared to the original image on the left. Notably, on the right side of the image, she can see that “Person” is detected. When she visually inspects this detection, she can see that a person is not only NOT present in the original output, but also that there are no people inside the bounding boxes. The attacked model, therefore, shows that it produces unwanted and inaccurate results as a result of the attack.
Defended Example Image 1
In the defended image below, Amelia can see that the erroneous “Person” objects on the left and right sides of the image are removed. Thus, she is able to see that the model defense is somewhat effective against the original PGD attack.
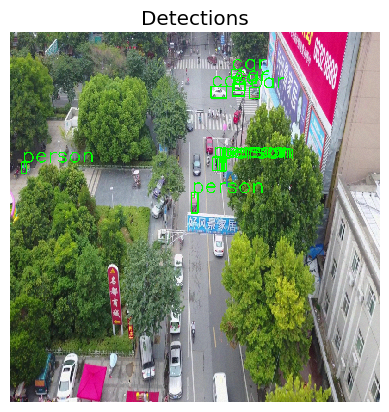
Patch Attacked Example Image 1
Amelia can immediately see the “patch” in the top left of the image - she sees the multicolored and pixelated circle that she set via the parameters above. She also notices that the patch was effective in altering the output results based on her visual inspection. She sees a number of the bounding boxes are missing when compared to the defended model output to the left.
Adaptive Patch Attack Wrap-Up
Now that Amelia has finished running the adaptive patch attack, she reflects and notices that some defenses can work quite well against some attacks. Some defenses, however, are still susceptible to attacks as shown with the patch attack versus the JPEG compression defense. She recognizes that it is important to remember that despite applying defenses, models are still vulnerable to many types of attacks. This further convinces her about the value of consistent and intentional test and evaluation efforts for the AI models that she works with.
You Completed Part 3
Congratulations! You completed Part 3 of the Drone Object Detection Tutorial. So far, in Part 1 you have learned the background and value of HEART, the requirements and prerequisites to use it, how to load the necessary libraries, and how to load the necessary data and object detection model. In Part 2, you learned how to create a PGD Attack on the model. You also learned how to interpret the outputs.
Now, in Part 3, you learned how to Defend the model and how to create an Adaptive Patch Attack.
Next, in Part 4 we will conclude and summarize everything you learned from the tutorial. We will see you in Part 4 of the tutorial.