DoD Tutorial - Part 1: Background, Imports, and Preparation
Background
Meet Amelia, a test and evaluation (T&E) engineer for a project at the US Department of Defense. The project’s mission is to improve the object detection capabilities of drones using Artificial Intelligence (AI) and Machine Learning (ML) models. These drones play a crucial role in various defense operations, such as surveillance, reconnaissance, and potentially even autonomous target identification. The drones’ object detection models are responsible for identifying different objects within their field of view, ranging from vehicles and weapons to personnel, in complex and dynamic environments.
The accuracy of these models is vital for mission success and safety. Any inaccuracies or vulnerabilities could lead to critical errors, such as misidentifying friendly forces as hostile or overlooking actual threats.
While at a conference, Amelia attends a talk about “adversarial attacks” on ML models. An adversarial attack is a deliberate attempt to mislead machine learning models, causing them to produce incorrect outputs or behaviors. These attacks manipulate input data, often imperceptibly, to exploit vulnerabilities in models trained on clean, well-curated datasets.

To illustrate, consider a drone object detection model that has been trained to identify tanks in battlefield scenarios. An adversarial attack might involve adding a nearly invisible sticker to a tank, causing the model to misclassify it as, say, a civilian car. This could have severe consequences in real-world defense applications, such as:
The model fails to detect an actual threat, which could put friendly forces at risk.
The model incorrectly identifies non-threats as threats, leading to unnecessary alerts and potential escalation of situations.
Fortifying models against adversarial attacks is not just a good practice but a matter of national security. These consequences highlight the importance of incorporating adversarial robustness measures into AI model development and testing processes. By proactively identifying and addressing vulnerabilities, developers can significantly enhance model reliability and trustworthiness, ultimately contributing to safer and more effective defense operations.
Value of HEART
During her research, Amelia finds the website for the Joint AI Test Infrastructure Capability (JATIC) program in the US Department of Defense. JATIC develops software products for AI Test & Evaluation (T&E) and AI Assurance.
Upon reading more from JATIC, Amelia learns about the Hardened Extensions of the Adversarial Robustness Toolkit (HEART). HEART is an open-source software project developed by IBM Research, built upon the Adversarial Robustness Toolbox (ART), another IBM initiative.

Key Features of HEART
HEART supports a key subset of adversarial attack techniques compared to ART. These enable Amelia to simulate a more relevant and current array of threat scenarios and conduct thorough assessments of model vulnerabilities.
Alignment to MAITE protocols to access this subset of ART and other JATIC tools for seamless T&E workflows.
HEART provides enhanced defense mechanisms to strengthen the model’s resilience against attacks. Notably, it includes Adversarial Training, a technique that exposes the model to adversarial examples during training making it more robust to such attacks.
As an open-source project, HEART benefits from a community-driven development model. This means Amelia can leverage the collective expertise and contributions of researchers and developers worldwide, staying updated on the latest advancements in adversarial robustness. Furthermore, contributing back to the project fosters collaboration and accelerates the development of more secure AI systems.
By integrating HEART into their workflow, Amelia can systematically test the adversarial robustness of their candidate drone object detection models, enabling the reliability and trustworthiness in critical defense applications.
Prerequisites and Preparation
Before diving into HEART, Amelia must ensure she has the necessary prerequisites and prepare accordingly. Here’s a more detailed breakdown:
Technical Proficiency
Amelia needs to have a solid foundation in Python and machine learning. Familiarity with PyTorch, the primary frameworks HEART supports, is crucial. Amelia already has a background in these areas.
Model and Data Access
Amelia needs access to the project’s pre-trained drone object detection model and data. Amelia has the model.
Environment
Ensure the development environment is compatible with HEART and the chosen deep learning framework. This is outlined in the next step.
Documentation Review
Amelia needs to do an overview read through of the HEART documentation so that she understand the framework before diving in.
By addressing these prerequisites and preparing adequately, Amelia sets the stage for a productive exploration and application of HEART in enhancing their drone object detection model’s adversarial robustness.
Environment Setup and Data Load
HEART Installation
The HEART installation and setup guide can be found here.
Libraries Import
To get started, Amelia imports all necessary libraries to use HEART. First, she imports general libraries such as numpy, functools, and matplotlib.pyplot. Next, she loads relevant methods from the Adversarial Robustness Toolkit (ART) that HEART extends. After importing the ART libraries, Amelia then loads the corresponding HEART functionality and specific Torch functions to support the model. Lastly, she uses a command to plot within the notebook.
Code: Import Statements for Necessary Libraries
# general imports
import numpy as np
from functools import partial
from pprint import pprint
import cv2
import matplotlib.pyplot as plt
from typing import Tuple, Dict, Any
from copy import deepcopy

# imports from ART
from art.attacks.evasion import ProjectedGradientDescent
from art.attacks.evasion import AdversarialPatchPyTorch
from art.defences.preprocessor import JpegCompression

# imports from HEART
from heart_library.estimators.object_detection import JaticPyTorchObjectDetector
from heart_library.attacks.attack import JaticAttack
from heart_library.metrics import AccuracyPerturbationMetric
from heart_library.metrics import HeartMAPMetric, HeartAccuracyMetric

# dataset imports
from datasets import load_dataset
from datasets import Dataset

# torch imports
import torch
from torchvision.transforms import transforms

# MAITE imports
from maite.protocols.object_detection import TargetBatchType
from maite.workflows import evaluate
from maite.protocols.object_detection import Dataset as od_dataset
from maite.protocols.image_classification import Augmentation
from maite.utils.validation import check_type

##### new, todo
from art.attacks.evasion import FastGradientMethod, BasicIterativeMethod, ProjectedGradientDescent
from art.defences.trainer import AdversarialTrainer
from heart_library.utils import process_inputs_for_art
from torch.optim import Adam

plt.style.use('ggplot')
%matplotlib inline
Loading Drone Dataset and Object Detection Model
Before loading data and model, Amelia defines a few different methods that she will use later on with the drone data. These include getting predictions with a confidence threshold, plotting images with the predicted bounding boxes, and a special wrapper for image data.
Code: Defining Methods for Use Later with Drone Data
# given a confidence threshold, determine which of the model's predictions are relevent
def extract_predictions(predictions_, conf_thresh):
    # Get the predicted class
    predictions_class = [visdrone_labels[i] for i in list(predictions_.labels)]

    if len(predictions_class) < 1:
        return [], [], []
    # Get the predicted bounding boxes
    predictions_boxes = [[(i[0], i[1]), (i[2], i[3])] for i in list(predictions_.boxes)]

    # Get the predicted prediction score
    predictions_score = list(predictions_.scores)


    # Get a list of index with score greater than threshold
    threshold = conf_thresh
    predictions_t = [predictions_score.index(x) for x in predictions_score if x > threshold]
    if len(predictions_t) > 0:
        predictions_t = predictions_t  # [-1] #indices where score over threshold
    else:
        # no predictions esxceeding threshold
        return [], [], []
    # predictions in score order
    predictions_boxes = [predictions_boxes[i] for i in predictions_t]
    predictions_class = [predictions_class[i] for i in predictions_t]
    predictions_scores = [predictions_score[i] for i in predictions_t]
    return predictions_class, predictions_boxes, predictions_scores

#plot an image with objects with the predicted bounding boxes on top
def plot_image_with_boxes(img, boxes, pred_cls, title):
    img = (img*255).astype(np.uint8)
    text_size = 1.5
    text_th = 2
    rect_th = 2

    for i in range(len(boxes)):
        cv2.rectangle(img, (int(boxes[i][0][0]), int(boxes[i][0][1])), (int(boxes[i][1][0]), int(boxes[i][1][1])),
                      color=(0, 255, 0), thickness=rect_th)
        # Write the prediction class
        cv2.putText(img, pred_cls[i], (int(boxes[i][0][0]), int(boxes[i][0][1])), cv2.FONT_HERSHEY_SIMPLEX, text_size,
                    (0, 255, 0), thickness=text_th)

    plt.figure()
    plt.axis("off")
    plt.title(title)
    plt.imshow(img, interpolation="nearest")

#wrapper for image datasets
class ImageDataset:

    metadata = {"id": "example"}

    def __init__(self, images, groundtruth, threshold=0.8):
        self.images = images
        self.groundtruth = groundtruth
        self.threshold = threshold

    def __len__(self)->int:
        return len(self.images)

    def __getitem__(self, ind: int) -> Tuple[np.ndarray, np.ndarray, Dict[str, Any]]:
        image = np.asarray(self.images[ind]["image"]).astype(np.float32)

        filtered_detection = self.groundtruth[ind]
        filtered_detection.boxes = filtered_detection.boxes[filtered_detection.scores>self.threshold]
        filtered_detection.labels = filtered_detection.labels[filtered_detection.scores>self.threshold]
        filtered_detection.scores = filtered_detection.scores[filtered_detection.scores>self.threshold]

        return (image, filtered_detection, None)

# specific dataset class to craft a targeted adversarial patch
class TargetedImageDataset:

    metadata = {"id": "example"}

    def __init__(self, images, groundtruth, target_label, threshold=0.5):
        self.images = images
        self.groundtruth = groundtruth
        self.target_label = target_label
        self.threshold = threshold

    def __len__(self)->int:
        return len(self.data)

    def __getitem__(self, ind: int) -> Tuple[np.ndarray, np.ndarray, Dict[str, Any]]:
        image = self.images.__getitem__(ind)["image"]
        targeted_detection = self.groundtruth[ind]
        targeted_detection.boxes = targeted_detection.boxes[targeted_detection.scores>self.threshold]
        targeted_detection.scores = np.asarray([1.0]*len(targeted_detection.boxes))
        targeted_detection.labels = [self.target_label]*len(targeted_detection.boxes)
        return (image, targeted_detection, {})
Before loading the data, Amelia loads the labels for the bounding boxes. She defines the standardized labels that are provided from the evaluation data set. Afterwards, she loads only a small number of samples to save compute when using this notebook.
visdrone_labels = [
    'N/A', 'person', 'bicycle', 'car', 'motorcycle', 'airplane', 'bus',
    'train', 'truck', 'boat', 'traffic light', 'fire hydrant', 'N/A',
    'stop sign', 'parking meter', 'bench', 'bird', 'cat', 'dog', 'horse',
    'sheep', 'cow', 'elephant', 'bear', 'zebra', 'giraffe', 'N/A', 'backpack',
    'umbrella', 'N/A', 'N/A', 'handbag', 'tie', 'suitcase', 'frisbee', 'skis',
    'snowboard', 'sports ball', 'kite', 'baseball bat', 'baseball glove',
    'skateboard', 'surfboard', 'tennis racket', 'bottle', 'N/A', 'wine glass',
    'cup', 'fork', 'knife', 'spoon', 'bowl', 'banana', 'apple', 'sandwich',
    'orange', 'broccoli', 'carrot', 'hot dog', 'pizza', 'donut', 'cake',
    'chair', 'couch', 'potted plant', 'bed', 'N/A', 'dining table', 'N/A',
    'N/A', 'toilet', 'N/A', 'tv', 'laptop', 'mouse', 'remote', 'keyboard',
    'cell phone', 'microwave', 'oven', 'toaster', 'sink', 'refrigerator', 'N/A',
    'book', 'clock', 'vase', 'scissors', 'teddy bear', 'hair drier',
    'toothbrush'
]

NUM_SAMPLES = 5

data = load_dataset("Voxel51/VisDrone2019-DET", split="test", streaming=True)
sample_data = data.take(NUM_SAMPLES)

def gen_from_iterable_dataset(iterable_ds):
    yield from iterable_ds

sample_data = Dataset.from_generator(partial(gen_from_iterable_dataset, sample_data), features=sample_data.features)

IMAGE_H, IMAGE_W = 800, 800

preprocess = transforms.Compose([
    transforms.Resize((IMAGE_H, IMAGE_W)),
    transforms.ToTensor()
])

sample_data = sample_data.map(lambda x: {"image": preprocess(x["image"]), "label": None})
Amelia finishes by loading an object detector based on ResNet50, which she wraps as a JATIC classifier for further evaluation and inspect to classified images.
MEAN = [0.485, 0.456, 0.406]
STD = [0.229, 0.224, 0.225]
preprocessing=(MEAN, STD)

detector = JaticPyTorchObjectDetector(model_type="detr_resnet50",
                                      device_type='cpu',
                                    input_shape=(3, 800, 800),
                                    clip_values=(0, 1),
                                    attack_losses=("loss_ce",),
                                    preprocessing=(MEAN, STD))

detections = detector(sample_data)

for i in range(2): # to plot all: range(len(sample_data))):
    preds_orig = extract_predictions(detections[i], 0.5)
    img = np.asarray(sample_data.__getitem__(i)['image']).transpose(1,2,0)
    plot_image_with_boxes(img=img.copy(), boxes=preds_orig[1], pred_cls=preds_orig[0], title="Detections")
Image Outputs
Amelia reviews the image outputs (below) that show example object detection ouputs. She overlays the predictions from the output detector (light green) in terms of bounding boxes (squares) and class (text) with the input image.
Example Detector Output 1
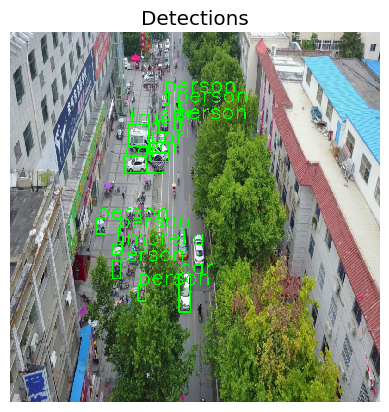
This image shows an overhead image taken from a drone flying over a street. Many different objects are detected including people, trucks, and cars. These are displayed inside the bright green bounding boxes.
Example Detector Output 2

This is a different image that also shows an overhead image taken from a drone flying over a street. Many of the same types of objects are detected including people, trucks, and cars.
Confirming Model Performance
To confirm that the model is performing properlty, Amelia computes the relevant evaluation metrics from HEART using Mean Average Precision (MAP). This metric combines the overlap and union of the predicted and ground truth bounding boxes to give an estimate of the goodness of the object detector, outputting a value between 0 (poor performance) and 1 (good performance). Reference
map_args = {"box_format": "xyxy",
            "iou_type": "bbox",
            "iou_thresholds": [0.5],
            "rec_thresholds": [0.0, 0.1, 0.2, 0.3, 0.4, 0.5, 0.6, 0.7, 0.8, 0.9, 1.0],
            "max_detection_thresholds": [1, 10, 100],
            "class_metrics": False,
            "extended_summary": False,
            "average": "macro"}

data_with_detections = ImageDataset(sample_data, deepcopy(detections), threshold=0.9)

metric = HeartMAPMetric(**map_args)

results, _, _ = evaluate(
    model=detector,
    dataset=data_with_detections,
    metric=metric,
)

pprint(results)
Mean Average Precision Output
Amelia can see that the performance is indeed valid as the MAP on the five test images is 1. The value of 1 means that the outputs are 100% aligned to the “ground truth” of the data set.
{'classes': tensor([ 1,  2,  3,  6,  8, 10, 15, 28, 35, 36, 77], dtype=torch.int32),
 'map_50': tensor(1.),
}
You Completed Part 1
Congratulations! You completed Part 1 of the Drone Object Detection Tutorial. So far, you have learned the background and value of HEART, the requirements and prerequisites to use it, how to load the necessary libraries, and how to load the necessary data and object detection model.
Next, you will use HEART to attack the model. We’ll see you in Part 2 of the tutorial.