How to Load Different Object Detectors
Introduction
This notebook provides a beginner friendly introduction to loading object detectors as part of Test & Evaluation with the VisDrone dataset. For illustration purposes, we first load the list of supported models and then load a subset of these models and visualize their output on two images. Being able to change the model under test is crucial within T&E.
❗Make sure the model you chose is suitable for the data you want to use❗
Intended Audience: All T&E Users
Requirements: Basic Python and Torchvision / ML Skills
Notebook Runtime: Full run of the notebook: <1 minutes
Reading time: ~10 Minutes
Order of Completion: Order in the guide.
Before you begin, you will want to make sure that you download the how-to guide’s companion Jupyter notebook. This notebook allows you to follow along in your own environment and interact with the code as you learn. The code snippets are also included in the documentation, but the notebook is provided for ease of use and to enable you to try things on your own.
Note
The How to Load Different Object Detectors Companion Notebook can be downloaded via the HEART public GitHub.
Contents
Imports and set-up
Get list of supported models
Load data and model
Loading a second, larger ResNet model
Load a third, FasterRCNN model
Conclusion and next steps
Learning Objectives
Loading and evaluating different models within HEART
Sanity checking models
1. Imports and Set-up
We import all necessary libraries for this tutorial. In this order, we first import general libraries such as numpy, then load relevant methods from ART. We then load the corresponding HEART functionality and specific torch functions to support the model. Lastly, we use a command to plot within the notebook.
import torch
import numpy as np
from torchvision.transforms import transforms
from heart_library.estimators.object_detection import JaticPyTorchObjectDetector, SUPPORTED_DETECTORS, COCO_DETR_LABELS
from heart_library.attacks.attack import JaticAttack
from functools import partial
from art.attacks.evasion import ProjectedGradientDescent

import cv2
import matplotlib.pyplot as plt

# dataset imports
from datasets import load_dataset
from datasets import Dataset

plt.style.use('ggplot')
%matplotlib inline
def extract_predictions(predictions_, conf_thresh, labels=COCO_DETR_LABELS):
    # Get the predicted class
    predictions_class = [labels[i] for i in list(predictions_.labels)]
    #  print("\npredicted classes:", predictions_class)
    if len(predictions_class) < 1:
        return [], [], []
    # Get the predicted bounding boxes
    predictions_boxes = [[(i[0], i[1]), (i[2], i[3])] for i in list(predictions_.boxes)]

    # Get the predicted prediction score
    predictions_score = list(predictions_.scores)
    # print("predicted score:", predictions_score)

    # Get a list of index with score greater than threshold
    threshold = conf_thresh
    predictions_t = [predictions_score.index(x) for x in predictions_score if x > threshold]
    if len(predictions_t) > 0:
        predictions_t = predictions_t  # [-1] #indices where score over threshold
    else:
        # no predictions esxceeding threshold
        return [], [], []
    # predictions in score order
    predictions_boxes = [predictions_boxes[i] for i in predictions_t]
    predictions_class = [predictions_class[i] for i in predictions_t]
    predictions_scores = [predictions_score[i] for i in predictions_t]
    return predictions_class, predictions_boxes, predictions_scores


def plot_image_with_boxes(img, boxes, pred_cls, title):
    img = (img*255).astype(np.uint8)
    text_size = 2
    text_th = 2
    rect_th = 2

    for i in range(len(boxes)):
        cv2.rectangle(img, (int(boxes[i][0][0]), int(boxes[i][0][1])), (int(boxes[i][1][0]), int(boxes[i][1][1])),
                      color=(0, 255, 0), thickness=rect_th)
        # Write the prediction class
        cv2.putText(img, pred_cls[i], (int(boxes[i][0][0]), int(boxes[i][0][1])), cv2.FONT_HERSHEY_SIMPLEX, text_size,
                    (0, 255, 0), thickness=text_th)

    plt.figure()
    plt.axis("off")
    plt.title(title)
    plt.imshow(img, interpolation="nearest")
    # plt.show()
2. Get List of Supported Models
#list the supported detector to choose from
SUPPORTED_DETECTORS
{'yolov5s': 'YOLOv5 model. Ref: https://github.com/ultralytics/yolov5',
 'yolov5n': 'YOLOv5 model. Ref: https://github.com/ultralytics/yolov5',
 'yolov5m': 'YOLOv5 model. Ref: https://github.com/ultralytics/yolov5',
 'yolov5l': 'YOLOv5 model. Ref: https://github.com/ultralytics/yolov5',
 'yolov5x': 'YOLOv5 model. Ref: https://github.com/ultralytics/yolov5',
 'yolov5n6': 'YOLOv5 model. Ref: https://github.com/ultralytics/yolov5',
 'yolov5s6': 'YOLOv5 model. Ref: https://github.com/ultralytics/yolov5',
 'yolov5m6': 'YOLOv5 model. Ref: https://github.com/ultralytics/yolov5',
 'yolov5l6': 'YOLOv5 model. Ref: https://github.com/ultralytics/yolov5',
 'yolov5x6': 'YOLOv5 model. Ref: https://github.com/ultralytics/yolov5',
 'fasterrcnn_resnet50_fpn': 'Faster R-CNN model. Ref: https://pytorch.org/vision/master/models/generated/torchvision.models.detection.fasterrcnn_resnet50_fpn.html#torchvision.models.detection.fasterrcnn_resnet50_fpn',
 'fasterrcnn_resnet50_fpn_v2': 'Faster R-CNN model. Ref: https://pytorch.org/vision/master/models/generated/torchvision.models.detection.fasterrcnn_resnet50_fpn_v2.html#torchvision.models.detection.fasterrcnn_resnet50_fpn_v2',
 'fasterrcnn_mobilenet_v3_large_fpn': 'Faster R-CNN model. Ref: https://pytorch.org/vision/master/models/generated/torchvision.models.detection.fasterrcnn_mobilenet_v3_large_fpn.html#torchvision.models.detection.fasterrcnn_mobilenet_v3_large_fpn',
 'fasterrcnn_mobilenet_v3_large_320_fpn': 'Faster R-CNN model. Ref: https://pytorch.org/vision/master/models/generated/torchvision.models.detection.fasterrcnn_mobilenet_v3_large_320_fpn.html#torchvision.models.detection.fasterrcnn_mobilenet_v3_large_320_fpn',
 'detr_resnet50': 'Detection Transformer. Ref: https://github.com/facebookresearch/detr',
 'detr_resnet101': 'Detection Transformer. Ref: https://github.com/facebookresearch/detr',
 'detr_resnet50_dc5': 'Detection Transformer. Ref: https://github.com/facebookresearch/detr',
 'detr_resnet101_dc5': 'Detection Transformer. Ref: https://github.com/facebookresearch/detr'}
3. Load Dataset and First Model
visdrone_labels = [
    'N/A', 'person', 'bicycle', 'car', 'motorcycle', 'airplane', 'bus',
    'train', 'truck', 'boat', 'traffic light', 'fire hydrant', 'N/A',
    'stop sign', 'parking meter', 'bench', 'bird', 'cat', 'dog', 'horse',
    'sheep', 'cow', 'elephant', 'bear', 'zebra', 'giraffe', 'N/A', 'backpack',
    'umbrella', 'N/A', 'N/A', 'handbag', 'tie', 'suitcase', 'frisbee', 'skis',
    'snowboard', 'sports ball', 'kite', 'baseball bat', 'baseball glove',
    'skateboard', 'surfboard', 'tennis racket', 'bottle', 'N/A', 'wine glass',
    'cup', 'fork', 'knife', 'spoon', 'bowl', 'banana', 'apple', 'sandwich',
    'orange', 'broccoli', 'carrot', 'hot dog', 'pizza', 'donut', 'cake',
    'chair', 'couch', 'potted plant', 'bed', 'N/A', 'dining table', 'N/A',
    'N/A', 'toilet', 'N/A', 'tv', 'laptop', 'mouse', 'remote', 'keyboard',
    'cell phone', 'microwave', 'oven', 'toaster', 'sink', 'refrigerator', 'N/A',
    'book', 'clock', 'vase', 'scissors', 'teddy bear', 'hair drier',
    'toothbrush'
]

NUM_SAMPLES = 5

data = load_dataset("Voxel51/VisDrone2019-DET", split="train", streaming=True)
sample_data = data.take(NUM_SAMPLES)

def gen_from_iterable_dataset(iterable_ds):
    yield from iterable_ds

sample_data = Dataset.from_generator(partial(gen_from_iterable_dataset, sample_data), features=sample_data.features)

IMAGE_H, IMAGE_W = 800, 800

preprocess = transforms.Compose([
    transforms.Resize((IMAGE_H, IMAGE_W)),
    transforms.ToTensor()
])

sample_data = sample_data.map(lambda x: {"image": preprocess(x["image"]), "label": None})
MEAN = [0.485, 0.456, 0.406]
STD = [0.229, 0.224, 0.225]
preprocessing=(MEAN, STD)

detector = JaticPyTorchObjectDetector(model_type="detr_resnet50",
                                      input_shape=(3, 800, 800),
                                      clip_values=(0, 1),
                                      attack_losses=(
                                                     "loss_ce",
                                                     "loss_bbox",
                                                     "loss_giou",
                                                    ),
                                      device_type="cpu",
                                      optimizer=torch.nn.CrossEntropyLoss(),
                                      preprocessing=preprocessing)
#use detector on data
detections = detector(sample_data)
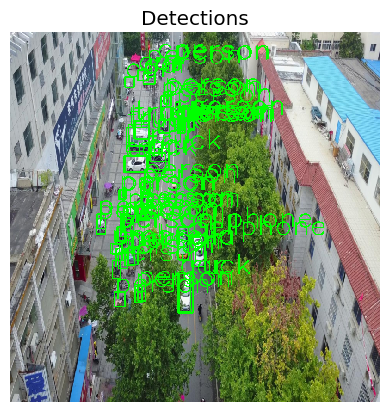
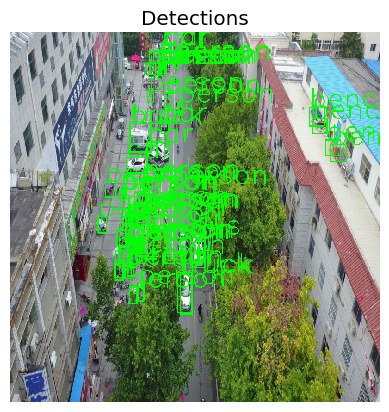
# plot the input images with the corresponding classification output
for i in range(2): # to plot all: range(len(sample_data))):
preds_orig = extract_predictions(detections[i], 0.5)
img = np.asarray(sample_data.__getitem__(i)['image']).transpose(1,2,0)
plot_image_with_boxes(img=img.copy(), boxes=preds_orig[1], pred_cls=preds_orig[0], title="Detections")
4. Loading a Second, Larger ResNet Model
detector = JaticPyTorchObjectDetector(model_type="detr_resnet101",
input_shape=(3, 800, 800),
clip_values=(0, 1),
attack_losses=(
"loss_ce",
"loss_bbox",
"loss_giou",
),
device_type="cpu",
optimizer=torch.nn.CrossEntropyLoss(),
preprocessing=preprocessing)
#use detector on data
detections = detector(sample_data)
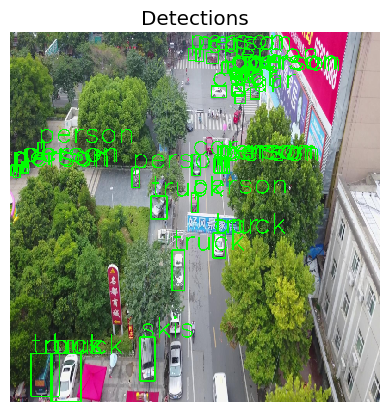
# plot the input images with the corresponding classification output
for i in range(2): # to plot all: range(len(sample_data))):
preds_orig = extract_predictions(detections[i], 0.5)
img = np.asarray(sample_data.__getitem__(i)['image']).transpose(1,2,0)
plot_image_with_boxes(img=img.copy(), boxes=preds_orig[1], pred_cls=preds_orig[0], title="Detections")
5. Load a Third, FasterRCNN Model
detector = JaticPyTorchObjectDetector(model_type="fasterrcnn_resnet50_fpn",
input_shape=(3, 800, 800),
clip_values=(0, 1),
attack_losses=(
"loss_ce",
"loss_bbox",
"loss_giou",
),
device_type="cpu",
optimizer=torch.nn.CrossEntropyLoss(),
preprocessing=preprocessing)
#use detector on data
detections = detector(sample_data)
# plot the input images with the corresponding classification output
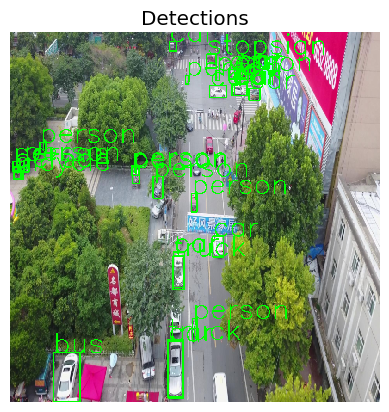
for i in range(2): # to plot all: range(len(sample_data))):
preds_orig = extract_predictions(detections[i], 0.5)
img = np.asarray(sample_data.__getitem__(i)['image']).transpose(1,2,0)
plot_image_with_boxes(img=img.copy(), boxes=preds_orig[1], pred_cls=preds_orig[0], title="Detections")

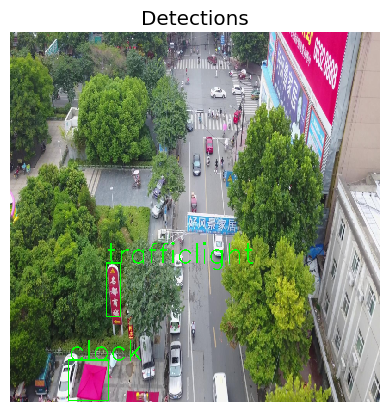
This time, the model outputs only few boxes, of which not all are right. Checking the documentation, we observe that the model was trained on the COCO dataset, and should be fine-tuned to perform well the drone dataset.
6. Conclusion
We saw that with HEART, different models can be chosen from the supported model list. However, care has to be taken that the chosen model fits the task at hand.
7. Next Steps
Check out other How-to Guides focusing on: