DoD Tutorial - Part 2: Attacking the Model
Introduction
Welcome to Part 2 of the Drone Object Detection Tutorial for HEART. In Part 1, you were introduced to Amelia and her use case for HEART, the requirements she needs to meet to use HEART, and how to install HEART and the relevant data set.
In Part 2, you will following Amelia as she uses HEART to attack the drone object detection model with HEART. This will inform Amelia on what vulnerabilities may exist in the model. It will also set up Part 3 where Amelia will work to defend the model.

Determining Threat Vectors
As Amelia delves deeper into exploring HEART for their drone object detection project, they begin to identify potential threat vectors that could compromise the system’s integrity. Amelia starts by thoroughly reviewing HEART’s documentation, focusing on the various attack techniques available and considers several threat scenarios:
An adversary could introduce nearly imperceptible Perturbation into input images, attempting to mislead the model into misclassifying objects or overlooking threats.
Evasion attacks are a type of attack that involves manipulating input data to evade detection or classification by a machine learning model. This could enable adversaries to hide threats or impersonate friendly forces.
Attacks are generally independent from the model, although they often rely on the model’s specific gradients. However, in the case of defenses or very particular models, it may be necessary to tailor an attack to model specifics, for example a rejection threshold. Such attacks are called adaptive.
Amelia is intrigued by Image Perturbations and Evasion Attacks. She learns about the Projected Gradient Descent (PGD) attack method which is a type of evasion attack that works through image perturbation.
Projected Gradient Descent (PGD) Attack Method
Definition: A projected gradient descent (PGD) attack is a method used in adversarial machine learning to generate adversarial examples that can fool deep learning models by iteratively perturbing the input data, guided by the model’s gradients, while keeping the perturbations within a defined constraint. You can learn more about PGD attacks here or here.

Amelia decides that using a PGD to attack her project’s model with HEART is a great way to determine if the model is vulnerable to these types of common and sophisticated attacks. She decides that it would be good to use the PDG attack methods with HEART to test her model since it is a very common form of attack. This should give her and her team a very good initial understanding of the model’s adversarial robustness and vulnerabilities.
Creating Adversarial Examples with HEART
First, Amelia will define the projected gradient descent (PGD) attack in order to apply malicious pixel-level changes to the base image. She runs the PGD attack and then performs a MAITE evaluation which returns relevant performance metrics about the model’s performance after the attack. At this point, Amelia can see how much the attack is maliciously affected the performance of the model and how accurate the outputs are versus the non-attacked model. She also then creates image outputs of the attacked model in order to visually inspect the results. In doing so, Amelia can see if there are any obviously incorrectly classified objects or missed objects in the image. Finally, Amelia will compare the attacked model image outputs to the original outputs created in Part 1 of the tutorial. Here, she can do a side-by-side comparison of the original outputs and the attacked outputs so she can more easily see the differences.
Preparing the Attack
In the code block below, Amelia first sets up the map_args. This sets parameters for how she is going to measure the performance of the attacked model. Next, Amelia defines the parameters that control how the attack will be conducts in the “attack” section. This shows, for example, the number of iterations that will be used and the size of the perturbation (how much change will be allowed to the image). The final two lines of code Amelia uses are for configuration of the dataset and ensuring the data inputs are in the correct format she needs.
In the code block below, Amelia first sets up the map_args. This sets paraemters for how she is going to measure the performance of the attacked model. Next, Amelia defines the parameters that control how the attack will be conducts in the “attack” section. This shows, for example, the number of iterations that will be used and the size of the perturbation (how much change will be allowed to the image). The final two lines of code Amelia uses are for configuration of the dataset and ensuring the data inputs are in the correct format she needs.
map_args = {"box_format": "xyxy",
            "iou_type": "bbox",
            "iou_thresholds": [0.5],
            "rec_thresholds": [0.0, 0.1, 0.2, 0.3, 0.4, 0.5, 0.6, 0.7, 0.8, 0.9, 1.0],
            "max_detection_thresholds": [1, 10, 100],
            "class_metrics": False,
            "extended_summary": False,
            "average": "macro"}

attack = JaticAttack(
            ProjectedGradientDescent(
                detector,
                max_iter=1,
                eps_step=0.01,
                eps=0.03,
                targeted=False,
                verbose=False),
        norm=2)

data_with_detections = ImageDataset(sample_data, deepcopy(detections), threshold=0.9)
Running the Attack
Next, Amelia gets ready to run the attack. Here, she initliaizes the performance metric that she defined in the previous code block. Next, she computes the results using the detector model, the dataset she chose, the performance metric, and the attack.
metric = HeartMAPMetric(**map_args)

results, _, _ = evaluate(
    model=detector,
    dataset=data_with_detections,
    metric=metric,
    augmentation=attack,
)
Re-Running Attack to Produce Image Outputs
Finally, Amelia recomputes the attack explicitly in order to create the new image outputs and bounding box results. This way, she can do a visual comparison to the original images to the attacked images in the next step.
x_advPGD, y, metadata = attack(data=sample_data)
detections = detector(np.stack(x_advPGD))

for i in range(2): #for all, write range(len(x_adv)):
    preds_orig = extract_predictions(detections[i], 0.5)
    img = np.asarray(x_advPGD[i].transpose(1,2,0))
    plot_image_with_boxes(img=img.copy(), boxes=preds_orig[1], pred_cls=preds_orig[0], title="Detections")
Image Results Comparison with HEART
Now that Amelia has run the attacks on the model using HEART, she can see the image outputs from the object detector model. Below, you can see both Example Image 1 and Example Image 2 in their original format (left side) from Part 1 of the tutorial and the output after being attacked (right side) in this section.
Image Outputs
Original Example Image 1
In the original image, Amelia can see the different objects detected, as identified by the green bounding boxes. Many items are detecetd such as Trucks, Person, and Car. Amelia does a visual inspection and sees that the bounding boxes are labeled accurately.
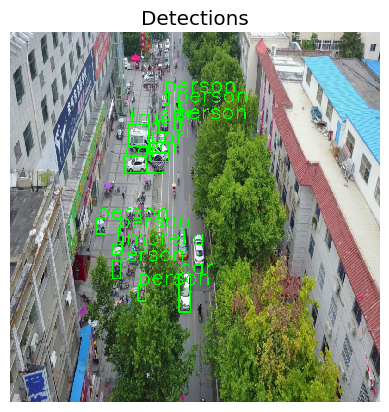
Attacked Example Image 1
In the attacked image below, Amelia can see some obvious differences in the bounding boxes compared to the original image on the left. Notably, on the right side of the image, she can see that “Person” is detected. When she visually inspects this detection, she can see that a person is not only NOT present in the original output, but also that there are no people inside the bounding boxes. The attacked model, therefore, shows that it produces unwanted and inaccurate results as a result of the attack.
Original Example Image 2
In the original example image 2, Amelia can again see the different objects detected, as identified by the green bounding boxes. She can also again see the different objects are detected like cars, trucks, and people. Amelia does a visual inspection and sees that the bounding boxes are labeled accurately.
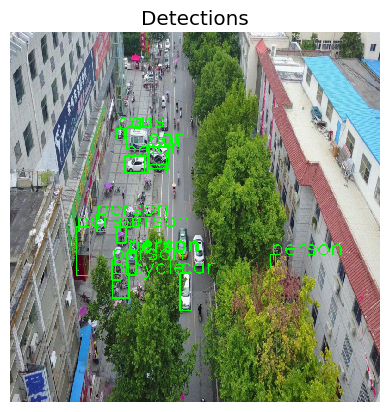
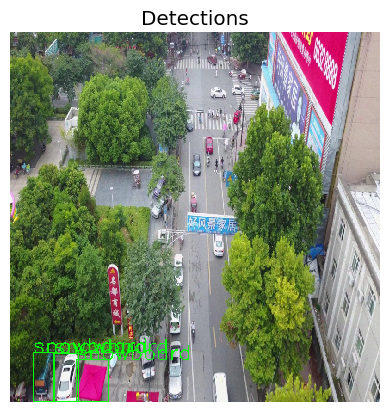
Attacked Example Image 2
In the attacked example image 2 below, Amelia sees and inspects a very different set of bounding boxes. Interestingly, many of the bounding boxes in the middle of the image are completely removed, showing the objects were not detecetd at all. Additionally, signs and trucks are being mis-identified as “snowboards”. After inspecting the image, Amelia can see that the attacked model produces a number of false positive ouputs as well as misses many other objects.

You Completed Part 2
Congratulations! You completed Part 2 of the Drone Object Detection Tutorial. So far, in Part 1 you have learned the background and value of HEART, the requirements and prerequisites to use it, how to load the necessary libraries, and how to load the necessary data and object detection model.
Now, in Part 2 you learned how to create a PGD attack for the model. You also learned how to interpret the outputs.
Next, you will use learn how to create defenses to defend the model against these types of attacks. We will see you in Part 3 of the tutorial.